Introduction:
Excel is a powerful tool for organizing and presenting data, and one of its lesser-known but highly effective features is the ability to add diagonal lines within cells. This can significantly enhance the readability and aesthetic appeal of your spreadsheets, especially when dealing with complex data sets. Whether you’re creating a product list, managing inventory, or organizing any other form of data, this guide will walk you through the simple yet impactful process of adding diagonal lines to your Excel cells.
Steps for Adding a Diagonal Line in Excel:
- Selecting the Cell: First, identify and select the cell where you want the diagonal line to appear.
- Accessing Format Options: Right-click on the selected cell and choose ‘Format Cells’ from the context menu. This opens the door to various customization options.
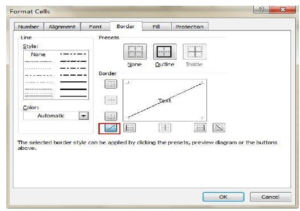
- Navigating to Borders: In the ‘Format Cells’ dialog box, click on the ‘Border’ tab to access border settings.
- Choosing the Diagonal Line: In the ‘Presets’ section, you have two options: ‘Diagonal Down Border’ and ‘Diagonal Up Border’. Select the one that best fits your needs.
- Applying the Changes: Click ‘OK’ to apply the diagonal line to your selected cell.
Additional Tips:
- For quick access, remember the ALT+E+T keyboard shortcut to open the ‘Format Cells’ dialog.
- To add diagonal lines to multiple cells simultaneously, select all desired cells before right-clicking to format.
- Experiment with line color, thickness, and style for a customized look.
Conclusion:
Adding diagonal lines to cells in Excel is a straightforward process but can make a significant difference in how your data is perceived and understood. This guide aims to help both novice and experienced Excel users in enhancing their spreadsheet designs with this simple yet effective formatting tool.