Introduction to Data Formatting in Excel Data formatting in Excel is a crucial step after data entry. It involves setting up how your data is presented, making it more visually appealing and easier to distinguish. For example, inputting a number like 4526300 in cells A1 and C1 appears as a plain number in A1, but after formatting cell C1 as a Number, it displays as 4,526,300, automatically adding a comma as a thousand separator.
Why Data Formatting Matters
- Essence of Data Unchanged: A key aspect of formatting is that it only changes the display, not the underlying data. It’s a common misconception that formatting as ‘Number’ converts text to a number or vice versa. Remember, the essence of your data is determined at the point of entry and is not altered by formatting.
- Uniform Presentation: Since data in Excel is often presented in tables, formatting ensures consistency across rows or columns, which usually contain the same type of data (Date, Number, Text).
- Specific to Number and Date/Time: Formatting primarily affects how numbers or dates/times are displayed. You can add thousand separators, decimal points, or change the date format. Text data remains unaffected by formatting.

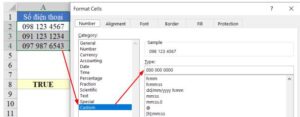
Differentiating Data Types It’s vital to distinguish data types since visually similar data might be of different types, leading to incorrect formatting or calculations. For instance, phone numbers might appear identical but be of different data types, affecting functions like VLOOKUP.
Identifying Data Types
- Number Data Type: Includes numeric data or dates/times. Use the
ISNUMBERfunction to check if a cell contains numeric data (=ISNUMBER(cell_reference)). - Text Data Type: Includes alphabetic characters or data starting with a single quote (
'). TheISTEXTfunction can verify text data (=ISTEXT(cell_reference)).
Formatting Options in Excel Excel offers various formatting options:
- General: Default format where Excel decides the best format.
- Number: Standard number formatting.
- Currency & Accounting: For financial data, including currency symbols.
- Date & Time: Formats for date and time data.
- Percentage & Fraction: For displaying percentages and fractions.
- Scientific: For scientific notation.
- Text: Converts any data into text format.
- Special & Custom: For specific formats like phone numbers or user-defined formats.
Key Takeaways for Effective Formatting
- Number and date/time data often require reformatting for consistent presentation.
- If formatting doesn’t change the data display, it might be text data. Always verify the data type.
- Regular practice is crucial for quick and accurate formatting.
By understanding and effectively applying these formatting techniques, you can greatly enhance the readability and professionalism of your Excel spreadsheets.
Example image: